Tutorials

Tuesday, April 16, 2019

Barbie Clothes-Tops, skirts, pants

Well hello there ladies! Here is something a bit different for you quilters. I got bit by the Barbie clothes bug this winter. Pretty bad I must say! It all started when I made several items for my  4yo daughter for Christmas. 


And then again when at a family Christmas, my cousin told us all about the mega Barbie playing sessions her 3 girls were doing together over the break. And since this cousin has given my daughter all their hand-me-down clothes to wear since she was a baby, (I haven't had to purchase any clothes for her, ever!) I decided to keep on with the Barbie clothes making and make a closet full of clothes for them. I felt I had barely scratched the surface with the patterns and bits of fabric and things I wanted to use anyways. One of her daughter's birthday is towards the end of February, so that gave me plenty of time as well as a deadline for designing and creating! Because without a deadline, I would probably never stop! lol They are too cute!


So, the next couple posts are all about the Barbie clothes I made. There are lots of free tutorials and patterns, and videos out there, but I wanted simple ones that were easy to make.  My favorite tutorials by far were by Craftiness is not Optional. Scroll halfway down the link for the Barbie tutorials. These tops and skirts are from her Cap sleeve shirt and Easy Barbie skirt tutes. 


The velcro I had available near me had adhesive on the back. And after a couple wears, it peeled right off the shirt. And to sew it on gummed up my needle and was a messy disaster. So, what I found worked out well was to apply it on with Krazy glue. Yes, it soaks through the fabric and as you can see looks darker there, but it works really well! And it was so much quicker than sewing it on. Even if I had velcro that wasn't sticky on the back, this way was much easier.


As you can see, I had fun using different little ribbons and bows and rik-rak. Lots of these ribbons I had saved from old gift bag handles. 


The halter top straps I made from an old elastic headband. (Those things never stay on my head anyways!) Or I had some leftover pretty elastic straps from my baby headband making days. Some tops I made fitted with darts, some I left a looser fit. I wanted them to be interchangeable with dolls of different sizes and shapes. 


So this was the tops and skirts post. And pants. These lovely ladies are sporting pants made from old socks, and the red pair is from Gretta's worn out leggings. I basically used this method, but I spread the legs farther apart so there was no seam down the side, and the excess fabric bunched in the middle-between the legs where it gets cut off anyway. But I did make a short seam down the back of the butt, after marking with a pin. Because Barbie has a tiny waist, but wide hips. 

Stay tuned for more adorable Barbie clothes, my favorite ---Dresses!

Double 9 Patch and Moda Love blocks


Carol made this amazing Double 9-patch quilt with hundreds of little bitty 9-patches.


I believe each little square piece is 1" finished.


I quilted an all-over paisley design on it in a cream thread.


I changed to a red thread for the border and continued with the paisley design in it.


Here's a look at the back.


Thanks Carol!


Here was our doGood Stitches blocks for February. It is called Moda Love. These are 12" blocks so each unit is 2". Dhia shared her tutorial here along with Moda's pdf version which uses 9.5" units to make a much larger version. Lots of little pieces here, but they are stunning blocks for sure!

Friday, April 12, 2019

Mary Jo's Mystery Quilt


Here I have another Mystery quilt. This one is Mary Jo's version. You might have seen Penny's version a couple weeks ago. 


The border was pretty big, so I filled it with a mix of grassy feathers, swirls, and leaves.


I custom quilted the blocks with a C2C design.


The light background was filled with more swirls, flowers, and paisleys. And feathers.


I used a light gray thread for this one.


I put a large flower design in the big light colored corners, just like I did to Penny's version


A solid lavender back is nice to show off the quilting. Here's a look at the border and pieced center parts.


The back of the blocks can be seen here. 


Thanks Mary Jo!

Thursday, April 11, 2019

Batik Rectangle Throw


Lois made this neat batik throw with lots of rectangles.


I quilted lots of all-over paisleys, leaves, and swirls.


I used a light brown thread.


The back.


Thanks Lois!

Monday, April 8, 2019

Baby panel, Lois's rectangle blocks


Norene 'made' this baby quilt using an adorable printed panel.


I kept it simple with some large swirls.


My kiddos had fun looking at and naming all the things. When I asked which one was her favorite, she pointed to all of them. :)


The back. Thanks Norene!


Lois made this neat quilt with what I would think would have been a jelly roll.


I quilted an all-over swirl and leaf combo design on it.


I used a coordinating light brown thread.


The back.


Thanks Lois!

Friday, April 5, 2019

Forest Floor


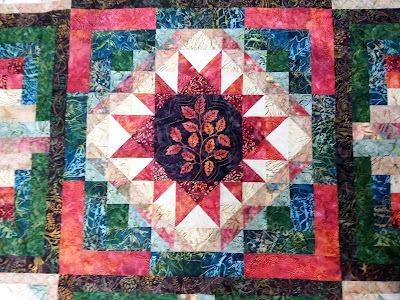
Sharon made this amazing quilt called Forest Floor. It was a block of the month project using gorgeous batiks and leaf prints. This was a mammoth sized custom quilt. Prepare yourself for lots of pictures!


Although Sharon has her own longarm, she wanted this one custom quilted beyond her skill level. Potentially able to enter into a show or two. I'm not really a 'show quilter' but I like a challenge every once in a while. So, here I am with it! No pressure or anything...


I did some researching to help come up with some ideas and inspiration. I found it on Jen's blog.  I used a lot of her ideas, but changed some areas to better suit my liking and skill set.


I used a variegated thread called 'Autumn Splendor' from Connecting Threads for most of the quilt. It has green, orange, plum, and gold in it, which coordinates perfectly with just about all the colors in this quilt.


However, I did use a cream thread for the lighter areas of piecing. The piecing and fabrics are the star of the quilt, and I didn't want a dark thread to distract in those light areas.  I also used a coral color in a few of those colored areas too.


I used the coral thread to outline the leaves and veins in the printed blocks, as well as the border around them.


This was a BOM, so no two blocks are the same in this quilt. I had to design something different for each one. A mix of ruler work and free handed designs.


Lots of leafy feathers in the large areas.


I had quilted this design in 8 different areas in the quilt, and after I got to #7, I just really didn't like how it was looking. At all. Kind of lumpy and lopsided and long and awkward looking. So I ripped them all out and did something different. A large swirl with leafy feathers. More free-motion and less formal looking, that's a bit more of my wheelhouse.


The back shows a bit better detail.


Thanks for trusting me with this beauty Sharon! I hope it shows well.