Tutorials

Monday, October 29, 2012

100% Feathers: An embroidered quilt

 
When I saw the embroidered feather wreath in Mary's quilt, I knew I would be quilting a few feathers...
 
 
But I didn't think I would be quilting it ALL in feathers!  But that's just what seemed to work best. 

 
And why not?  They fill in all the corners and the center of the wreath just perfect.
 
 
And even the wide border and sashings too. 


A solid white back shows off the quilting really well.  This was one quilt I hated to return!

Wednesday, October 24, 2012

Another T-shirt Quilt- Volleyball Coach

 
It's another T-shirt quilt!  This one was made for a former college volleyball coach. 
 
 
The quilting for this one I took straight from the fabric.  Flowers and curly Q's. 


Quilting around this one was kind of tricky...

 
A solid navy back really shows off the quilting.  Especially with lots of back-tracking.
(In gray thread)

Wednesday, October 17, 2012

How in the heck am I going to quilt Kenny?- A T-shirt quilt

 
Roxanne made this T-shirt quilt for her daughter.  She is fairly new to quilting, but you would never guess that with this quilt!

 
Swirls were all over the backing fabric and in the cornerstones too so that's what I quilted in the black border. 
 
 
I filled in the blocks with plenty of loops and a few stars and flowers. 
 
 
The center block I did a little special...


And then there was the Kenny Chesney block.  How in the world was I going to quilt this?   I couldn't just meander all over his face!  I ended up outlining his body, hat, necklace, and chair.  And chin.  And the words.  And set him on fire.  :)  That ought to do it! 

Thursday, October 11, 2012

Scrappy Strips

 
Norene made this super scrappy quilt using 2.5 by 4 inch strips.  She used up a lot of scraps- it will cover a queen size bed with plenty of overhang. 

 
Norene likes plenty of quilting, so I tried something different.  Free-form waves with random circles here and there. 

 
I got the inspiration for the quilting from Allison's quilt.  Lots of trips back and forth of the table with this one!


Wednesday, October 10, 2012

AQS Show: A teeney-tiny Sampling

Well the Show has come and gone.  Once again I was blown away at the show quilts and by all the vendors. 
 
 
This was in the Japanese quilt display.  The designs in these blocks are all hand embroidered. 
 
 
Another awesome quilt in the Japanese display. 

 
This one was in the DMAQG Pineapple quilts display.  Whoa.


Each of those pineapple layers is 1/4 inch wide!  And it was all paper pieced. 

 
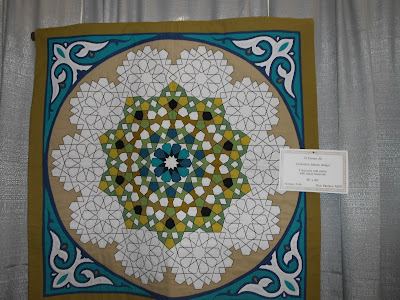
This is one of the many amazing quilts in the "Stitch like an Egyptian" display- all of which were for sale.  All hand embroidered and appliqued.  Very cool.
 
 
There was also a display of improvisational medallion quilts.  I really liked this one.  The flowers in the pots are not appliqued, it's just the fabric.  Very clever! 
 
That's pretty much all the quilt photos I took! 


And this little trooper took it all in.  He didn't even mind giving himself his bottle while Mom wandered around all the quilts.  :)

Monday, October 1, 2012

Fall Double Dresden Delight- Table runner style

 
Before...
 
 
After!! 
OK.  This is probably the worst before and after photos ever.  Because it looks exactly the same.  But what I did after I quilted and bound this table runner was tea-dyed it!  Yes, I had another adventure in tea-dying.   

 
I made this table runner for my Mom's birthday.  She loves fall and fall colors and she hosts numerous Thanksgivings, so this will get a lot of use.  My random assortment of "fall" colors from my stash didn't quite mesh together; some were light, some were pretty vibrant, so I thought when it was all done, a tea bath would bring it all together.  I don't have any close-up photos of it before, but there is some difference, especially in the lighter pieces. 


Oh!  And I got the idea for the Double Dresden Delight from Amy!  Her post here led me to the tutorial.   To sum it up in a nutshell you sew the insides just like you do the outside points.  No center circle applique needed!  Although I will say that pressing and turning all those points got to be pretty tedious.  Not difficult though :)