Tutorials

Tuesday, January 28, 2014

Harley T-Shirt Quilt

 
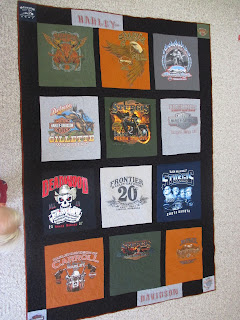
A few weeks before Christmas I was asked if I could quilt and bind a quilt by Christmas.  I was pretty much caught up with my quilting (well, the stuff that HAD to be done by Christmas anyway)--I just had my own handmade gifts to do, so sure, I could do it.  I didn't know it was a Harley Davidson t-shirt quilt until I got a hold of it the next day.  Oh yeah!  I knew how I was going to quilt it right away. 

 
Kodi was the maker of this quilt.  A first-time quilter I hear!  She 'stole' her husbands shirts and when he asked about them she said she gave them away.  This quilt was going to be a surprise!

 
I quilted a pointy-paisley-ish swirl all over that looks similar to painted motorcycle flames.  Oh yeah! 

 
Since it was a pretty dark quilt, I used a charcoal colored thread throughout the quilt. 
 
 
It turned out pretty neat I think.  I decided to to make an attempt at putting on the binding with my longarm.  It's something that a lot of longarmers do quite a bit and although I have wanted to give it a try on one of my own projects, I always seem to forget about it until it's halfway off my frame.  So why not give it a go with a first-time customer's quilt that's a slight rush order??  That seemed perfectly logical.  Well, I used my channel lock which was a huge pain in the rear.  It's really hard to adjust it ever-so-slightly to catch a seam that was ever-so-slightly short.  I found out later that you should really use a ruler instead.  But it turned out just fine. 

 
 Anyway, we found out well after Christmas that our husbands actually know each other.  And when they saw each other a few weeks ago, it was reported that he just LOVED the quilt and it's just the most beautiful quilt he's ever seen!  lol.  Glad to be a part of the surprise--Thanks Kodi!


Friday, January 17, 2014

Handmade Christmas gifts for dolly

 
Well, I'm finally getting to my handmade Christmas gifts posts.  A month late, but oh well. 
 
First up was this little ticker-tape doll quilt.  These are so fun to make.  I have a chunk of practice quilting on white fabrics that I cut into a large square.  I don't remember the dimensions of this one, but I usually go somewhere between 16 and 18 inches.  Then I sort through my scrap bins and pull out little bits and pieces and lay them out on my quilt and pin them all down as I go.  Why am I telling you this--Amanda Jean's tutorial is here.

 
This was my major project--matching pajamas for my niece and her American Girl doll.  I got word that she sometimes goes to sleepovers where all the girls bring their dolls along.  So I thought this would be perfect!
 

I used this Simplicity 1511 pattern because it was on sale.  And it was the only one that had patterns for both girl and doll.  The sizes only go up to 8, and I found out afterwards that my niece needs a 10.  Uhhh.  So I cut my pattern pieces a bit bigger and hoped for the best.  I used the longer top and the bigger, non-leggings pants patterns thinking that would also help me out in making the larger size.
 
 
I used this really thin knit (but really soft!) that is a real pain to work with.  The guys (yes, guyS.  As in not one, but two!) working the cutting station at Hancock warned me it was hard to work with, but to gently pull the fabric taught as it feeds through your machine.  That was a good tip and probably saved me from throwing a fit and some cuss words.  That being said, I will avoid this kind of fabric at all costs from now on!  The pattern had you make a pretty little lettuce ruffle to the hem of the sleeves and pants by stretching the edge while you zig-zagged the edge.  I tried it out on a scrap first and it was NOT going to work for me.  The best it would do was a sloppy looking rumple.  So I decided that leaving the edges raw as they were was the way to go.  Not as cute or finished looking, but still very functional.  It turned out fine.  Not department store quality by any means, but my niece was very pleased with it.  No word yet on the fit, but I think there is room for her to grow in it. 

If I'm going to ever do this again, I think buying the girl pj's plus another matching set in a much smaller size to make the doll's version out of will be the way to go.  I'm sure you could probably get more than one set of doll pj's out of one pair of pj's.  It would save you a lot of time to just make the doll version.  And the doll is not going to complain or even notice if it doesn't turn out perfect.  Yep, I'm a wuss when it comes to this kind of thing.  Sorry Rae and all you kid clothes-makers out there.  :) 

 
And this was my favorite part.  A doll has to have a sleeping bag if she's going to a slumber party right??  I modified this tutorial a little in order to quilt it.  (of course!)  There are lots of tutorials out there for doll sleeping bags.  The first one I came across required a long fancy double pull zipper.  I was about to add it to my shopping list when I realized that although it was a nice detail, this is for A DOLL.  Dolls can't work a zipper.  So keep it simple you dummy and just make a pocket-type sleeping bag.  With a matching pillow with lace trim.  So cute!
 
So although it may seem that I go the 'extra mile' by making hand made gifts, I often take the easy way out and cut corners whenever possible.  But noone would ever know that if I didn't tell them :)

Thursday, January 9, 2014

Diane's log cabin


Diane made this log cabin quilt--I think it may be her first quilt ever.  But it might be her last she says.  She enjoys cross stitch and knitting much more.  She is an amazing and prolific cross stitcher!  


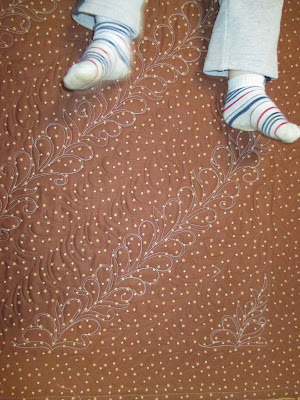
This was one of those few quilts where I knew exactly how I was going to quilt it when I first saw it. 
Feathers.  100%


I had the perfect brown to match her border.  In the logs, I used the same brown, and a cream in the light areas.  So, its hard to see in this pic. 


But not on the back!


Monday, January 6, 2014

Client Christmas Cards


This Christmas I decided to make and send out cards to all of my clients of the 2013 calendar year.  This is what I came up with--scrappy Christmas trees!  They were pretty simple and fun to make.  I used an old stove top stuffing box and drew my trees on them.  Next I ironed on my fusible web to the back.  Then the fun part of laying my little fabric scraps on and pressing them on.  I ironed on little brown scraps onto the card for the stump and then glued the trees on top.  Next, I hot glued on the little bows.
 
 
I had a heck of a time finding blank cards that were the right size, folded in half, and had envelopes.  And looked slightly Christmasy.  I finally settled on these.  They were a little wild and un-Christmasy looking, (especially the printing inside the envelopes) but it was the best I could do without devoting a whole afternoon shopping for cards.  (out of 2 whole aisles of stationary at Target, something there had to work by gosh!)  So, I think I've started a little business tradition for Christmas.  And I have plenty of extra blank cards to do so!
 
Anyways, I am really grateful for all my clients.  I somehow manage to do more quilts than the year before without having to do hardly any advertising.  Which means there's a lot of word-of-mouth going on out there.  That gets me more clients than blogging does.  Actually blogging has generated zero clients for me.  Which is fine.  I don't really have my blog set up for that and I don't want to get soo busy that I'm stressed out with it.  (Not that I wouldn't welcome that though!)  I guess I blog for me and as a place to share my quilting and other projects.  They're (almost) all here in this one place! 
 
So good bye 2013 and bring on 2014!  It's going to be a busy year--in more ways than one!


Thursday, January 2, 2014

A couple firsts: Commissioned quilts and a new young quilter's quilt #1


Judy had me make three quilts for her kids for Christmas.  She had purchased kits and had me piece, quilt, and bind them.  I was relieved that they were very simple to make-just some yardage with a couple borders.  All flannel, including the back.  This was the only pic I got of the top, but I think you can get the idea of it.  I'm new to the whole commissioned quilt from start to finish thing. But it went well.  (Thanks Grandma for watching the kiddo for a couple solid days while I cranked these puppies out!)  I decided to keep track of my time constructing the quilts (not including quilting time-that was a separate charge) and charged an hourly rate.


She wanted to keep the quilting simple so I did loops with a few leaves.  There is a similar looking leaf in the border print, so that's where that idea came from. 
 
A few things I learned from making commissioned quilts:
*Be careful if you decide to pre-wash their fabric for them.  Have your client do it, or don't do it at all. 
*Charge an hourly rate that is suitable for your area and your level of expertise.  Plus, it keeps it much simpler for you to ensure you are getting paid what you deserve for your time, talent, and workmanship.  Although it might be harder to know how long a project will take you if someone wants a quote, after a while you will get an idea how long it will take you to do certain tasks, like binding by hand for example.
*I don't mind doing simple projects for people (like these quilts or the baby quilts I did here), but making commissioned quilts is NOT something I really want to actively pursue.  Honestly, I'd much rather be working on my own projects or quilting on the longarm than making someone else's project.
 
So that's my 2 cents on that subject.  Have you ever made a commissioned quilt??  What tips or advise do you have? 
 
Thanks for choosing me to make your special quilts Judy.  I hope your family enjoys them for many many years to come!

 
OK--This little quilt here is a first-time quilt made by my 12 year old niece Emma!  (With Grandma's assistance.)  She decided to give it to her horse riding instructor for Christmas.  how sweet is that?! 

 
I didn't know what to quilt on it, so I ended up doing a random assortment of everything :)  swirls, flowers, leaves, feathers, big bubbles...I don't even remember what all else. 


Wednesday, January 1, 2014

Katie's Quilt


It was my turn to orchestrate the quilt for December for my do. Good Stitches Haven group.  I decided to try to make the block as quick and easy as possible for my ladies since December is a very hectic and sometimes stressful month for the holidays.  So my instructions were to just sew strips of fabric together into a 12.5 inch block.  My only rule was to keep the blocks either warm or cool colors.  They could make 2 warm, 2 cool, or one of each.  So far I only have about half the blocks from everyone.  But I am looking forward to playing around with them and figuring out what the heck I'm going to do with them all!


 Here's a quilt my sister made.  


I went a little fancy on the borders.  Fancy for me anyways.  The pieced blocks were perfect for design spacing.


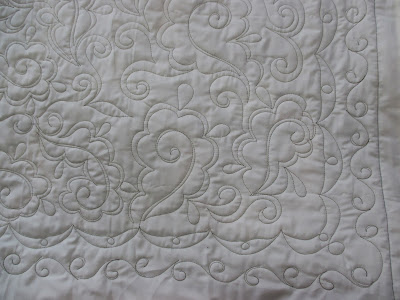
 In the center I did an all-over feathered paisley design.  


But my favorite part is the back.  I used a sage green thread on both the top and bottom so it really shows up on the cream colored solid back.