Tutorials

Monday, February 29, 2016

Joan's Sunbonnet Sue Embroidery


Now that I finally got the Quiet Books posts out of the way, I can get back to sharing quilts!  It's almost March already, and I'm just getting to the stuff I quilted at the beginning of the year.  I should just keep that detail to myself because you would never know that :P  Joan made this adorable Sunbonnet Sue wallhanging and used crayons to color her in.


I c2c'd the pieced borders, and did a feather in the white border.


I outlined the embroidery and filled in the background with a simple meander.


Thanks for having me quilt this adorable quilt Joan!

Friday, February 26, 2016

Quiet Book Cover


The past couple weeks I have been sharing my Quiet Book journey.  I made 3 quiet books to give at Christmas. I made a total of 10 pages for each book, and now I will share how I put them all together. 


Once I figured out the order of how the pages will be in the book, I stitched them right sides together, leaving a few inches to turn right side out. Each page has a single layer of batting in-between.  I clipped and trimmed the corners and turned them right side out and gave them a good press.  Next, I topstitched the edges all the way around at about 1/8th of an inch.  Then I marked my button holes at the 4 and 7 inch mark, and had the button holes start and stop so that there was 3 inches between them both.  I had some issues with my machine and doing the buttonholes, but I pushed through and got them all done.  They don't look too pretty some of them, but oh well.  They are functional!


The Cover
I used some canvas fabric for the covers. I wanted them larger than the pages so that they would protect the bits and pieces that hang over the edges.  I cut two layers for the front at 12 inches square.  Two layers for the back are 12 by 15 inches.  I angled the right edge that folds over by measuring down 2 inches and 4 inches across on both sides and trimming.  Add some elastic (a headband in my case) to the part that folds over and really secure it by backstitching over it a few times.  Sew along the edge leaving a few inches to turn right-side-out and trim the corners, turn and press. Top stitch all the way around.  Sew on a large button on the front and that's it!  I threaded shoe laces to hold it all together, but I've seen people use binder rings too.


I wanted to include a pocket on the back for all those times when you think you have everything put away, then you find a random piece on the floor. (like every time!)  Just slip it into the pocket on the back instead of having to open it all back up and find the right page and place it goes to.  I admit that by the time I got to this point---ALMOST DONE!!---I just wanted to finish these things and be done with them, so I found the easiest way to add a zipper pocket.  An old pair of Jeans!  I just cut the fly off an old pair of my husband's jeans into a large rectangle, pinned it on (raw edges and all), and top-stitched it down, going two times around. done!  I know it looks pretty silly--especially if you think about where you are putting those pieces! lol.  But it works just fine and no one has made any funny comments about it. Yet.

This concludes my Quiet Book Series.  I hope you enjoyed it, or maybe even inspired you to try making one yourself. Back to the quilting next time!

Monday, February 22, 2016

Quiet Book ::Pie/Garden

Pie Page


Both girl quiet books got a lattice pie page.


It's fun to weave the strips for your pie.  The tutorial is pretty quick and easy for this one.

Garden Page


Instead of pie, my son has a garden page.  (He does like playing with his sister's pie page though!) We plant a pretty big garden every year and he loves to help plant and hoe and pick and harvest.  It's a big part of our summertime.  I made sure to include root veggies that we actually plant--carrots, onions, and potatoes. We are not beet or radish fans over here. We tried rutabagas once.  But they never sweetened up--they tasted pretty gross! I think we are going to try parsnips this year.


Alright. Back to the quiet book.  No garden is complete without a little wagon to lug your harvest back to the house with! (I wish root vegetables were really this clean when you harvest them!)


There are lots of super cute garden tutorials out there with elaborate "soil". Some have button holes or slits for each little vegetable. But then you need a open bottom to be able to retrieve any veggies that get stuck in the dirt.   I wanted something much simpler and quicker to make.  I cut 3-2.5 inch strips out of felt and laid them all right above each other.  Then, I stitched along the bottom of each strip, then stitched all the way up and back down every 1.5-2 inches apart. (I didn't measure my spacing at all, I just started sewing!) There! Lots of little pockets to plant your veggies!


Carrots.  I followed the example I saw here for the veggies.  I slipped in a small long triangular green piece of felt into the tops, and then snipped the leaves once they were stitched together. Felt is thin and can rip apart easily once it is in a thin strip like these leaves are.  Some leaves have been pulled off, so you may want to do 2 fused layers here. Or perhaps use a different, more durable material for the leaves.  But, felt works for us.  Torn leaves look more like real veggies in nature. :)


I also did some onions (yes, those are supposed to be onions!) and potatoes.  I zig-zagged a couple irregular eyes on the potatoes to help them look a little more like potatoes and not big beans or something. 

Oh man. I just thought of something for the garden page.  A spigot with a hose! You could make a hose out of string and he could water the garden! And the spigot lever could move up and down somehow...You should do that!

And there you have it!  That's all my quiet book pages! Phew they were a lot of work! There were more pages I wanted to include, but had to stop myself and limit to just 10 pages.  I really wanted to do a hair braiding page, one with a belt to buckle, there was this one with a forklift I know my son would have LOVED, one with numbers, or a clock...too many ideas, not enough time!

In my next (and final) quiet book post I will discuss how it all goes together and how I did the cover.

Friday, February 19, 2016

Quiet Books::Dress Up

Dress Up Doll


There are so many adorable quiet book pages with dress-up dolls. I had to do one! These were by far the most time consuming pages to do, but definitely the most fun!  I was inspired the most by Charla Anne's dolls and for the clothes, I liked this tutorial the best.  I liked how the clothes were simple, flat, and reversible.  Two-sided clothes means more clothing options!  Plus I wanted to use various fabrics and prints, not felt.


Once I drew out the pattern for the shirts, shorts, dresses, etc. I traced them onto fusible webbing and cut them out--just separating them, not cutting on the lines. Then you iron it onto the wrong side of your chosen fabric and cut it out.  Do the same for the backside version, then iron them together--fusible web to fusible web. It makes for a sturdier garment. I placed them inside a folded piece of paper when ironing them together to keep the glue from melting everywhere.  Then trim any excess bits off and ta daa!


These are the backs of the picture above.  I stitched the bits of ribbon onto the dress before I fused the other side to it. So much fun to rummage through my scraps, ribbons and trims, looking for fun clothing options!


I even made little sleeper jammies with some flannel and fleece scraps.  I drew the zipper and snap details with a fine tipped fabric marker.
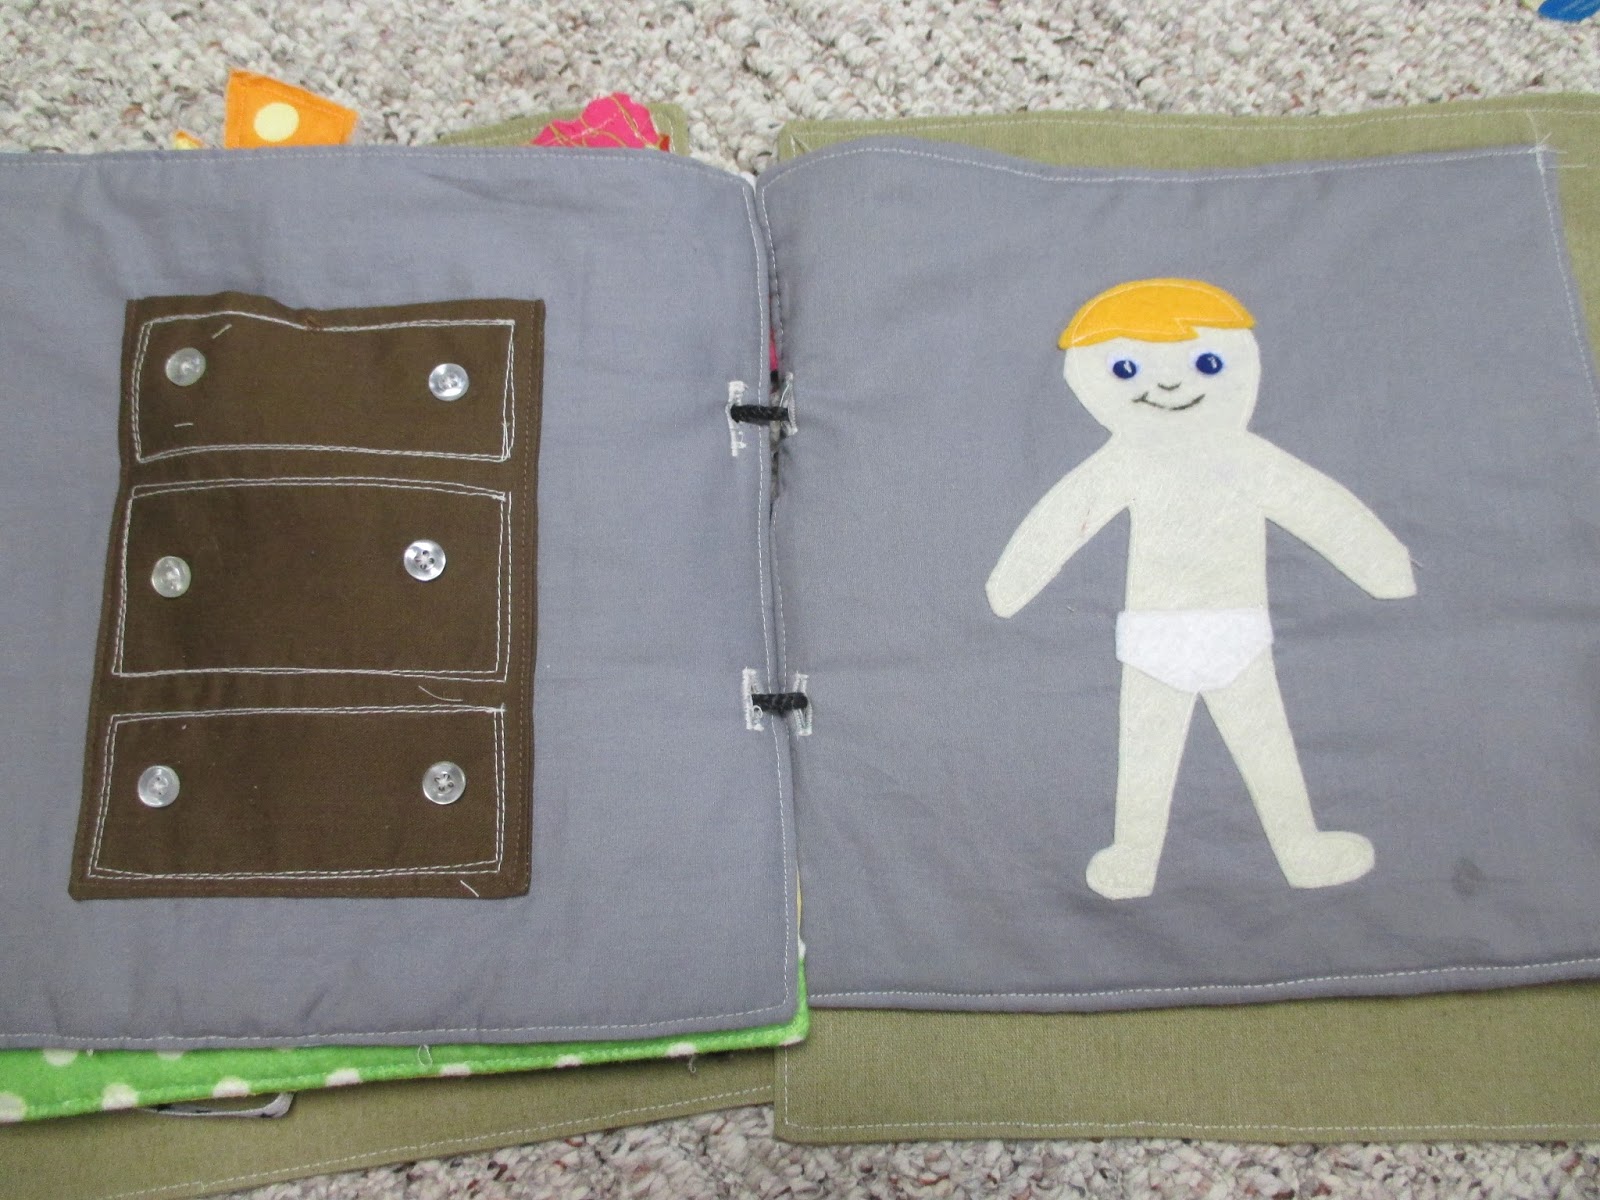

The Boy.


While the girls got a couple adorable dresses this poor guy just got denim overalls. But they are my son's favorite.


The reverse.


One more girlie.


The dresser is just a pocket that I stitched drawers onto and added 6 buttons (drawer pulls).  I hand sewed a little snap in the middle to help keep the clothes from falling out.  I will say that I would make the dresser a little bit wider next time.  The jammies have a hard time getting jammed in there!


The yellow flowered fabric is from a dress I made as a 4-H project looong ago.  And it looked just like that, minus the orange ribbon.  Mom made me a dress out of the peach fabric when I was little too.  So they have a little re-creation version here.


The other sides. Sooo cute!!


Each doll has jeans/pants, shorts, tank top, short sleeved shirt, long sleeved shirt, and jammies.  The girls have a short sleeved and a sleeveless dress, and a skirt. I wanted to make a long sleeved dress, but didn't get to it.  The boy has his overalls. :)


I found one in-progress photo! He couldn't wait to get his hands on these guys.  He loves to put them in their 'party' clothes, then their work-jeans, then time for bed in their jammies. :)  He has already put in a request for some shoes...we'll see.


Tuesday, February 16, 2016

Quiet Books:: Tractor and Feed Wagon

Tractor and Feed Wagon Quiet Book Page


My son LOVES tractors and all kinds of machinery, so I knew I had to have a page that included a tractor for him.  I designed my tractor from this example I found. 


I placed a snap in the center of each wheel so that they can spin. And added a few more on the rear wheel hub for decoration only. I was having a heck of a time with the snaps! The back wheel had three layers of felt that i was trying to get the tines through, (front and back of the black tires, and 1 yellow hub) plus two layers of fusible web. Hopefully you will have better luck and patience than I did with it. Eventually I got frustrated to the point where I slammed it on the table and had my Mom work on it!  (thanks Mom.)


I couldn't have a tractor without something for it to pull! I chose a feed wagon--a Knight just like daddy's to be exact. This page is my original design.


The spout folds down...


...And the feed folds out to the angus cattle.  I made do with a small strip of farm scene fabric and a couple other little bits to complete the scenery.  Needless to say my son is in love with this page!

Monday, February 15, 2016

Quiet Books:: Flower Garden/Vase

Flower Garden/Vase


My next set of pages are 'Pick Flowers for the Vase'. I made one for each kid-three total. I didn't use a pattern for my greenery, I just starting snipping away at my green felt scraps and pinned them on, making sure to give plenty of space for 5 flowers.  I stitched my felt grass, stems and leaves on using some decorative stitches on my sewing machine.


The leaves I just did a decorative stitch down the center.  Perfect for hiding a little trinket behind. I totally raided my Mom's massive button and bauble stash for this!


The ladybug patch used to be on my back-pack in high school!


Peek-a-boo little Angels!


And here are my 3 vases, all sitting on a table with tablecloth in a wallpapered room.  My flowers are a bit over-sized I think, but I guess it just makes for a very full bouquet!


Boy there was a lot of hand sewing on these!

30 buttons
6 dragonflies
3 hidden angels
1 ladybug, 1 kitty and 1 ribbon flower


The flowers are just little quilt sandwiches- top, batting, and back fabric- that I stitched various flower shapes around the edges and cut out with either regular scissors, pinking shears, or I happen to have a scallop rotary cutter blade that I finally got to try out. Then I stitched a button hole in the centers.  Some flowers have the same fabric on the front and back, and some I made different.  More choices!

Friday, February 12, 2016

Quiet Books::Beads-On-A-String/ Shapes Matching

Beads on a String


My 18 month old got this beads-on-a-string page instead of tic tac toe. I used a few fused felt scraps from making letters for their name to make a 'bridge' to go under.  Next they go through a key ring that I just zig-zag stitched on.   Then a piece of denim for a tunnel.  If I were making this page again I would make it into three separate strings instead of one long one--it gets pulled way out of whack.  That and my string is too thick. It takes two hands to move the beads along--Gretta is not that coordinated yet.

Shapes Matching


The girls got a shapes-matching 2-page spread.  This one was fun to make too. I wasted used up a lot of time searching the internet for good shape patterns to print out until I finally decided that I could just draw up my own before I found ones that were the right size and shapes I needed. As you can probably tell by my asymmetrical stars. (notice the heart is missing its Velcro dot. use dots made to stick to fabric.)


To make Mariah's (5) a little more challenging she has to match the shapes to the words instead of the outline. Letter recognition!  I don't know if many 5 year olds know what a trapezoid is, but Mariah will! lol. I wasn't thinking about that when I made it. Perhaps a diamond or something else would be a better choice. 

For the pocket I just  cut out a large rectangle and with right sides together stitched around the edge leaving a 3-4 inch gap open along the bottom to turn right side out.  After the corners are pulled with a pin to make them sharp and the whole thing pressed, center your zipper along the top and with your zipper foot, stitch as close to the zipper as you can.  Then pin your pocket in place-the bottom of your zipper is now attached to the pocket. Topstitch all around the pocket and then around the top of your zipper.

Not only do you get shapes and color and letter recognition, but you get the zipper action with this page too!

Thursday, February 11, 2016

Quiet Books::Knock knock/tic tac toe


My next pages of my quiet books are "Knock Knock. Who's There?" and Tic Tac Toe.  I hit the jackpot of quiet book tutorials with this Riley Blake Designs blog post.  There is a whole bunch of super cute tutorials there.  I did a few of them, including these two.


kids can knock on the door and open it to see who or what is inside. The inside being the clear vinyl pocket. I stuck some random things from newspaper ads in there, but you can put in pictures of friends or family in there too.
 

I used the clear plastic from a pack of onesies or something.  I had to use my Iowa counties fabric for the background--that's home for us!


This one is my son's.


He picked out pictures of tractors and combines for his!  You can find the tutorial here.


The tic tac toe page was a must for the bigger kiddos. It was by far the easiest page to make.  Quick too.


I will say that it is worth the investment in getting Velcro dots that are meant to stick to fabric. They are more expensive, so I got the cheaper ones but didn't realize until I got home that they say they are not meant for fabric. But I used them anyway. so far they are holding up ok. Out of multiple pages on all 3 books I think ive had to glue 2 or 3 dots back on.

More pages to come!