The past couple weeks I have been sharing my Quiet Book journey. I made 3 quiet books to give at Christmas. I made a total of 10 pages for each book, and now I will share how I put them all together.
Once I figured out the order of how the pages will be in the book, I stitched them right sides together, leaving a few inches to turn right side out. Each page has a single layer of batting in-between. I clipped and trimmed the corners and turned them right side out and gave them a good press. Next, I topstitched the edges all the way around at about 1/8th of an inch. Then I marked my button holes at the 4 and 7 inch mark, and had the button holes start and stop so that there was 3 inches between them both. I had some issues with my machine and doing the buttonholes, but I pushed through and got them all done. They don't look too pretty some of them, but oh well. They are functional!
The Cover
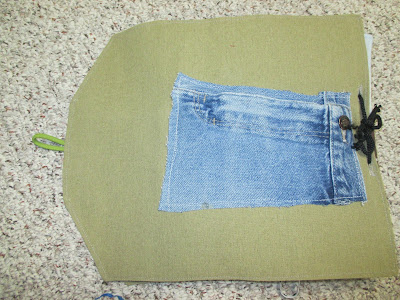
I used some canvas fabric for the covers. I wanted them larger than the pages so that they would protect the bits and pieces that hang over the edges. I cut two layers for the front at 12 inches square. Two layers for the back are 12 by 15 inches. I angled the right edge that folds over by measuring down 2 inches and 4 inches across on both sides and trimming. Add some elastic (a headband in my case) to the part that folds over and really secure it by backstitching over it a few times. Sew along the edge leaving a few inches to turn right-side-out and trim the corners, turn and press. Top stitch all the way around. Sew on a large button on the front and that's it! I threaded shoe laces to hold it all together, but I've seen people use binder rings too.
I wanted to include a pocket on the back for all those times when you think you have everything put away, then you find a random piece on the floor. (like every time!) Just slip it into the pocket on the back instead of having to open it all back up and find the right page and place it goes to. I admit that by the time I got to this point---ALMOST DONE!!---I just wanted to finish these things and be done with them, so I found the easiest way to add a zipper pocket. An old pair of Jeans! I just cut the fly off an old pair of my husband's jeans into a large rectangle, pinned it on (raw edges and all), and top-stitched it down, going two times around. done! I know it looks pretty silly--especially if you think about where you are putting those pieces! lol. But it works just fine and no one has made any funny comments about it. Yet.
This concludes my Quiet Book Series. I hope you enjoyed it, or maybe even inspired you to try making one yourself. Back to the quilting next time!


No comments:
Post a Comment