Tutorials

Monday, December 19, 2011

Another Scrappy Baby Quilt


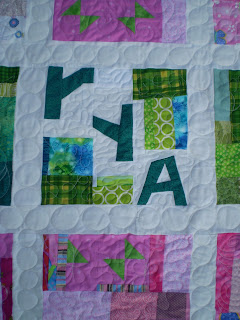
This one I made is for little Rya. 


Perhaps avid readers of my blog will recall the letter N in my alphabet quilt project that I said needed to be re-done will recognize that it has been re-made into these new letters.  3 letters in your name is just the right amount for this quilt block. 


Super scrappy, and super random quilting. 

Just so you know--I make each block 10" (9.5 inches finished) and use 2.5"  strips (2 inches finished)for the sashing. 

Wednesday, December 14, 2011

Embroidered Baby Quilts


These 2 baby quilts were embroidered by Rose.  They are pretty adorable!


Swirling water and with a few fishes thrown in is what was quilted in this one.


And how sweet is this one?


All-over Curly-Q's and flowers seemed to fit the bill here.

Monday, December 5, 2011

Peggy's Christmas Quilts

Peggy had me quilt these 4 fun little Christmas quilts.  One for each of her adult children and one for herself.  They have seen the quilt tops, so I'm not spoiling any surprises here.  :)

This first one I did free-motion feathers.  I used a Holiday variegated thread which really turned out nice with her festive colors.


The back.


Quilt #2...

...and the back.  The quilting on this one goes along with the design in one of the light fabrics. 


Quilt #3 was curly-Q's and holly leaves.  See where I got the idea for curly-Q's??


And #4 was loops and holly leaves. 


These were the last quilts I did on my old longarm machine.  That's right- I purchased a new longarm about a month ago! (I'm really good at keeping this blog up to date huh?)  It's a Nolting Fun Quilter 20".  I think I have finally gotten to the point where I'm comfortable with it.  It takes a while to get used to the feel of a different machine- much like driving a different car.  Perhaps I will share my new machine with you in another post.  But for now, I have more holiday quilting to do!

Monday, November 28, 2011

Scrappy Baby Quilt for Briggs


Well, I finished another one of these scrappy baby quilts for a special little guy.  He's only 6 months old now (I'm really on top of things here!), but I got to meet him for the first time on Thanksgiving.  He sure is a cutie! 


This time I made a special center block.  B for Baby Boy Briggs.  I'm still in alphabet letter-making mode I guess.

I have fine-tuned my scrap block making in the last couple weeks by separating all my little scraps into shoe boxes.  I have one for yellows, blues, greens, pinks, and reds.  So now I keep a box close by my sewing machine and sew a random piece together here and there as a "leaders and enders" project.  Once I get a 10 inch block together, it gets squared up and put into a drawer with a stack of other blocks.  So I always have one of these little quilts almost ready to go! 


I used this cute Adventurer fabric for the back- I got it at Hancock Fabrics. 

Linking up once again to Megan's Sew Modern Monday--Check out some more neat projects!


Tuesday, November 15, 2011

A tree for Baby's room

I haven't blogged much lately.  Not because I don't have anything to post about (I have a lot actually), I just have been too busy to take the time to make a post! 

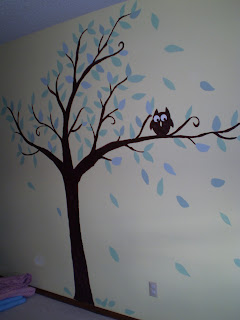
One major thing that has kept me busy is getting the baby's room ready.  Once we got the room painted, I decided to paint a tree.  I did a Google image search for "baby room tree" and found tons of inspiration! 


For the owl's eyes I traced a circle on some painter's tape and then used a 3/4 inch circle punch to remove the darker part of his eyes. 


And here is the finished tree complete with foliage and an owl.   The tree was vaguely penciled out, but mostly free-handed.  Not much different than free-motion quilting really.  I did draw out the owl though. 

(wow the color is really washed out in this pic!)

You can buy fancy decals that just stick onto the wall that are probably a lot quicker to do, but I just bought a tiny can of brown paint and some sponge brushes and spent less than $10 total.  The paint for the leaves we already had.  Oh yeah!  The crib will go under the owl like in the pic above. 

I'm pretty pleased with how it turned out!  My kiddo better like it too because it's staying up until he's 18-like it or not!  :)

Wednesday, November 2, 2011

Fall Blogger's Quilt Festival Entry


It's time for the Fall Blogger's Quilt Festival! 

If you are a new visitor to my little blog- welcome!  I have enjoyed sewing since my childhood days and have recently started a little longarm quilting business.  This blog features both- my various sewing projects and my longarm quilting. 

Here is my entry, Pieced Scrap Borders from Red Pepper Quilts.  (Free Tutorial Here.)  I started this quilt about a year ago (posted here and here) and finished it this summer.  (posted here)  My version has an added border.  I just love it!  I used up a lot of scraps with this one.  The white fabric is from an old bed sheet, and the back was a large piece my sister picked up at a garage sale.  The only fabric I actually bought was the binding. 


I quilted free-motion feathers on it.  If I were to quilt it again I think I would have picked a more contemporary design that would match the pattern better.  But I was really digging feathers at the time I guess! 


A peek at the back.

Amy'sCreativeSide


Monday, October 31, 2011

Premie Baby Pants


So my sister had a little boy a few weeks ago.  Born just past 32 weeks and weighed a little under 4 lbs.  Baby and mom are both doing really well! 

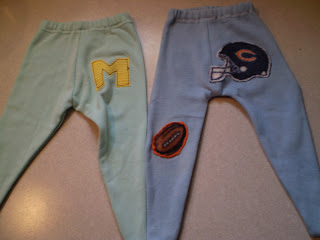
I had a hard time finding premie baby clothes, so I found a pair of 0-3 month pants and used them as a pattern to make these out of a couple old T-shirts.  I  made them a bit smaller and made the legs longer and enclosed the feet.  (Which I realize you can't see in my picture)  I have no idea how well they will fit him, but I think they will fit better than the 0-3 month pants. 


I used the bottom hem of the shirt as the top, so all I had to do was rip out an inch or so to sew up my side seams so it wouldn't be sewn closed.  Then thread your elastic through the pre-exhisting casing.  Top stitch all around the bottom of the elastic to close it all up.  Easy! 

For the little decorations I just used some HeatNBond to iron them on, then top stitched about 1/8 of an inch around the edge.

That is the back of the football pair.  He's a big Chicago Bears fan.  :)

Linking up to Sew Modern Monday--Check it out!

Wednesday, October 26, 2011

A couple quilts from Karen

I met up with Karen at the AQS show a few weeks ago to hand off these two lovely quilts.

This pattern is called Synchronized Squares.  You can read Karen's post here.


Since the blocks have raw edges I quilted a flower in each block.  With loops in between. 

She even had a few extra blocks for the back.  I somehow managed to line up the blocks on the back with the ones on the front so the quilted flowers matched up.

And she made this throw with Christmas fabrics. And you can see Karen's post on this quilt here

Free-motion feathers!

Thanks for having me quilt your quilts once again Karen!


Thursday, October 20, 2011

Joan's Jelly Roll quilt


This is Joan's quilt made from a Jelly roll.  Pretty cool pattern huh?  (#36)


I quilted the same design as the last quilt, Mt. Hood.

Monday, October 10, 2011

Hexie and Alphabet projects update


Do you remember back in the beginning of the year when I started working on these hexagons?  No?  Well the post about it is here.  And this is my progress so far.  I just laid out the "flowers" to see how big it is.  So far only only about 5 or 6 flowers are actually connected together.  But I think I am going to make this tree wall hanging for Baby's room with them. 

Hmm, after just re-visiting my inspiration pic, I am thinking that my treetop is pretty huge.  It may need some pruning to scale it down. 


And here is my alphabet so far.  Only a few letters left!  I think I might re-do the 'N' because
1) it looks more like an 'H' and
2) I accidentally used the same fabric as the 'A'.  I can't have that! 

Thursday, October 6, 2011

AQS Show success and #35

Well the AQS Show last week was a success!  I learned a lot from my classes from Sue Patten and looked at a ton of awesome and inspiring quilts.  I tried out longarm machines (more about that later) and I met up with Karen who passed off a couple quilt tops for me to quilt.  I took lots of pictures of amazing quilts, but then realized that I needed permission from the quilter to post them on my blog, so ummm no pictures here.  But if you mention it in a comment, I will be happy to send you some via e-mail! 

This was the Des Moines Quilt Guild Show that was in the Wells Fargo Arena. 


A lot of these quilts could very well have been included in the AQS show, they are that good.  There were a few I recognized that were entered in the Iowa State Fair this year too.


This one is called "Mt. Hood".  It uses 5" squares.  A lot of them!  My sister made this one looooong ago (like maybe almost 10 years), and now it's finally finished!  (Got that binding sewn on yet Sis?)


The quilting design was my free-hand attempt of this pantograph


Talk about a pieced back!  And this was quilt #35.

Monday, September 26, 2011

A couple more quilts and going to AQS Show!

Quilt #33 for the year was this scrappy 16-patch.

Meandering was requested.  No problemo.

This cozy throw is all flannels.  (#34)


I had free reign on this one so I went with the floral theme and did 5-petal flowers and leaves. 

There was a slight problem with this one.  As I got to the last pass I realized that the back was baaaarely long enough, if not a tad short by 1/4 to 1/2 inch.  Oof.  What do I do??  Rip it all out and start over easing the top in better?  Stretch the heck out of the back to make it fit?  Trim 1/4 inch off the entire edge of the quilt?  Noo way.  After consulting with my customer we decided to take it off  the machine and luckily she had plenty of purple flannel left to sew a strip on the back.  And it was no problem to put it back on and finish the last pass.  Phew!  It all worked out, but I hope I never let it happen again.  I always do lay out my quilts to make sure the backs and battings are large enough and oriented the right way, but somehow I neglected to notice how close this one was.  Lesson learned. 

**Also**

I know there is a lot of blogging going on about the Sewing Summit coming up, which I will not be attending.  But I WILL be attending the AQS Show in Des Moines later this week!!  Planning on taking a couple longarm classes from Sue Patten, looking at lots of gorgeous quilts, trying out all the new longarm machines, and maybe just a little shopping too.  But not too much shopping.  :) 
Anyone else going??

Friday, September 9, 2011

A special announcement and a new project!

This is my latest sewing project that I am pretty excited about.  But first of all- I think it could be time to announce an exciting development that I have been reluctant to post about.  And that would be that my husband and I are expecting our first child in January!!  We are very excited!  And it's a boy which we are very happy about-especially the hubs.  YAY!  So instead of sewing and quilting, I've been napping and reading up on pregnancy, birthing, newborn care, and baby names.  I have found that there is a lot to learn!

So now, of course, I needed to start in on a baby quilt.  In the July/August '11 issue of Fons & Porter's Love of Quilting magazine an alphabet quilt was featured in the "This Old Quilt" section.  Hmm, that's a neat idea I thought, an alphabet quilt!  I Googled alphabet quilt images and found THIS.  Go ahead and look at it.  It is awesome!  Loooooove it!!

The original wonky letters blogger wrote a book about them, which looks very cool,  but I decided to just wing it and see what happens.  I printed out my inspiration picture to help me mentally break down each letter and figure out what letter parts need to be sewn first.  I started out with the "I" and worked my way up to the "W".  So far the "W" has been the trickiest for me.


The only rule I have is that each letter is 4.5 inches tall.  I am going to have 3 orange letters.  Why 3? Because isn't that how designers create interest-by using groups of odd numbers??  I couldn't decide on just 1 orange fabric, and 5 would just be too many, so I used 3.  And orange because it contrasts nicely with the rest of the letters in blues (opposites on the color wheel) and greens.   See- I was paying attention in art class!  And orange also because it's a boy color.  (There is such a thing as boy and girl colors you know. At least that's what I thought when I was 6!)  

This will become a wall hanging for the baby's room, which is currently painted in pink and lavender with a princess ballerina border from the previous homeowners...  That will have to change soon. 

Wow, this is a pretty wordy post-for me.  Anyway, that's what I've REALLY been up to this summer!

Saturday, September 3, 2011

#32- A Scrap Quilt


Carol made this super scrappy quilt.  She puts together the neatest scrap quilts!  Each square measures 2 inches finished. 


Just a simple medium meander on this one.  This is the 32nd quilt I've quilted this year.  I'm a good 3 weeks behind my goal of a quilt a week.  ack.  Time to get busy! 

Sunday, August 28, 2011

Another Ticker-Tape doll quilt and a Quilt for a Sports Fan


I made another Ticker Tape Quilt.  I've lost count on how many of these I've made as gifts.  They are always a hit though!  This will be linked up to fellow Iowan Megan's blog: Canoe Ridge Creations- for Sew Modern Monday.  Check out the much cooler things other people made!


This was my latest quilting finish- A Sports-themed quilt!  This was my first attempt with quilting a sports motif. 


I quilted footballs, basketballs, baseballs, lots of stars and loops. 


And then I also threw in some sports-themed words like: champion, touchdown, overtime, goal, and so on.  I think quilting out words is a lot easier than making recognizable footballs and basketballs.  This was quilt #31 for the year.